
How To
Get to Know Your Control Panel

A. Power Button
Press and hold for 2 seconds to power on/off.
B. Temperature Adjustment
Tap (+) or (-) to adjust; hold for rapid change.
C. Preheat Button
PREHEAT: Press to begin preheating; the button turns green to indicate the grill is preheating and remains red when not. Hold the 'Preheat' button for 2 seconds to switch temperature units."
D. Indicators Light
NOW: Current temperature.
SET: Shows the temperature you’ve set.
C°/F°: Indicates temperature unit.
E. Meat Probe Mode
Insert probe and set the desired temperature of your meat between 113°F (45°C) and 212°F (100°C). The grill will beep three times when the target temperature is reached, then stop heating and enter 'RES' mode to rest the meat.
Safety Features

HOT Indicator: Shows when the grill is too hot to touch. Turn off when the grill temperature is below 122°F.
Importance
Use the flat part of your finger for capacitive buttons. "ERP" display indicates the need to check the thermometer.
Panel Sticker Replacement Guide
Over time, exposure to high heat and various weather conditions may cause the control panel sticker to loosen or peel off slightly. When this happens, we recommend replacing it with a new screen sticker to ensure the control panel remains easy to operate and keeps your grill looking great. Follow the steps below to install your replacement panel sticker.
1. Locate the probe port

2. Remove the probe plug
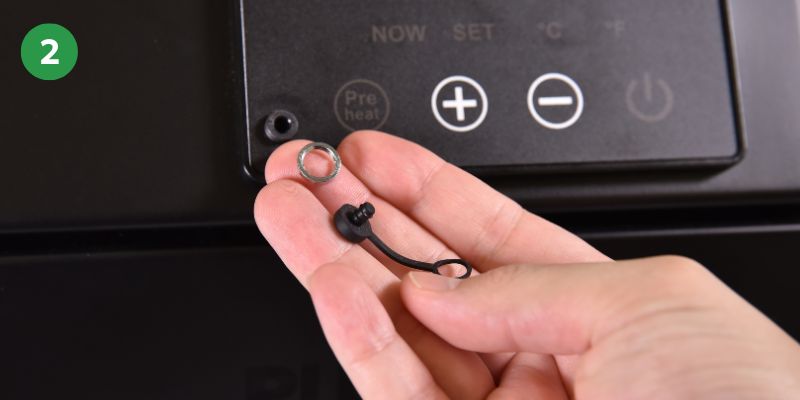
3. Peel and remove the old sticker

4. Remove adhesive left on the panel

5. Prepare the new sticker

6. Support the socket

7. Place the sticker and reinstall plug

8. Finalize and test

Watch the Installation Video
For a detailed walkthrough, watch our video tutorial on how to replace the panel sticker:
Cleaning Instruction
Ensure your grill is turned OFF and unplugged, and that all components and accessories have cooled down before moving or cleaning.
STEP 1
Remove the cooking grid and warming rack (if used) after each use and hand-wash with warm, soapy water.
STEP 2
Carefully remove the cooled grease tray and the grease receptacle under the control panel and safely discard grease contents after each use
STEP 3
Ensure all parts are dry before reassembling the grill.
How To Place/Use Our Integrated Probe?

Once your Turbo E is well preheated, insert the integrated probe into the thickest part of your protein.
PLACEMENT
Steak, Pork Chops, Fish Fillet...
1. Insert the meat probe horizontally into the center of the thickest part of the meat.
2. Ensure the tip of the meat probe is inserted straight into the center of the meat, not angled toward the top or bottom.
3. Position the meat probe close to, but not touching the bone, and avoid inserting into gristle or heavy fat areas.
Whole Chicken
1. Insert the meat probe horizontally into the thickest part of the breast, parallel to, but not touching the bone.
2. The tip should reach the center of the thickest part of the breast without piercing through into the cavity.
DO NOT use the meat probe with frozen proteins or for cuts of meat thinner than 1 inch.
The thickest part of the fillet may not be the center. It is crucial that the tip of the meat probe is placed in the thickest part to ensure accurate results. *If the temperature reading is unexpectedly high or increases too rapidly, verify that the probe tip is not protruding through the food.
Quick Start GuideGRILLING
1. Setup
Press the 'Preheat' button. The grill will beep, and the light will indicate when it has preheated to 500°F. Insert the meat probe into the food, following the guide in the previous section.
2. Adding Food
1. Place the food with the probe into the grill once preheated.
2. Connect the probe’s other end to the grill; it will enter “Meat Probe Mode” automatically.
3. Choose your target temperature, considering carryover cooking (set 10-20°F lower).
3. Track Progress
Monitor the food's temperature on the control panel. "NOW" indicates current temperature, "SET" shows target temperature.
4. Rest & Carryover Cooking
1. When the target temperature is reached, the grill will beep and display 'RES' to indicate rest mode.
2. Let the meat rest to allow for carryover cooking, ensuring it reaches perfect doneness.
Meat continues to cook due to carryover cooking even after the grill enters 'RES' mode. Adjust your target temperature accordingly to prevent overcooking.
Quick Start GuideTime for Effortless Grilling!
Subscribe for the latest on Turbo E & Unlock Exclusive Discounts!
